Updated: 2021-08-20
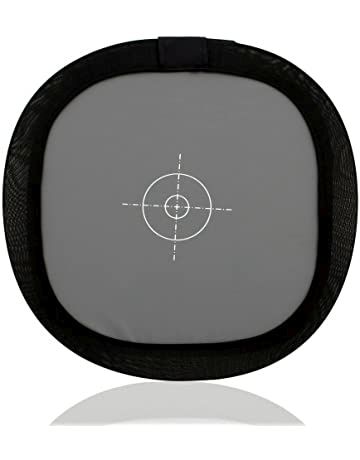
All professional photographers use the grey card, which is a scratch resistant cardboard or plastic rectangle, usually A5 in size. The colour of the card corresponds to 18% grey (or gray in UK) according to the Kodak scale, that is why they are sometimes called Kodak grey cards. The gray cards are sold separately or included in various photographic accessory kits. It is used as an exposure aid, and more often as a calibration card for correct white balance.
All modern digital cameras have an automatic white balance feature. This means that if you take a picture of a white surface like a piece of paper, the camera will determine what the “true” white of the paper is, and adjust all the colours in the photo so it appears to be the “right” white. A grey card is then used as a neutral color reference card to check your white balance against.
What is a grey card?
It’s actually a pretty simple way to get accurate metering results right on a photo location and in a given light. This is because the TTL (TTL = Through The Lens) metering systems of modern digital cameras are set to this shade of grey.
At a time when most photographers shoot in RAW format and quality post-processing is at least half of the success, it looks like we won’t need such tools anymore, but I beg to differ. Personally, I prefer to do honest work straight as they say “on set”. So let’s see when the gray card comes in handy.
Is it the same as the black card used in photography (just lighter)?
No, photographers usually use grey cards and black cards for different purposes . An 18-gray card has a neutral gray color and is used when you are testing a correct exposure. A black card, on the other hand, has a solid black color and is often used when you are actually taking a photograph. When you use a black card, it will prevent any part of the picture from being affected by the exposure of the picture. This makes it possible to take a “print-proof” photograph.
How to use a Grey Card for an accurate exposure
The built-in metering system of today’s digital camera is a sophisticated TTL device that comprehensively detects the photographic scene. When measuring the light reflected from the subject to be photographed, it evaluates not only the amount of light but also its colour (so it assumes the type of light source). By working with the AF module, it accounts for the focus distance, distinguishes the main subject from the background, and recognizes figures, faces, and even the model’s eyes.
And most of this information is available to the camera before we even press the shutter. Extremely fast processors evaluate the scene, mapped in hundreds of segments, at lightning speed (long gone are the days of 2 and 5 segment exposure metering). What remains is the sensor calibration value – yes, it’s that 18% grey we mentioned earlier. What does this mean for us? It means that a scene containing a multitude of colors and brightness differences from shadows to high brightness will be evaluated very accurately by the system.
But sometimes we just shoot subjects that are quite far from the calibration value. Simply put, we often photograph objects that are white, or dark, even black, and these can fool an otherwise perfect system. The solution is simple. We place a gray balance card in the scene next to our subject and meter the exposure on it.
We fill the entire frame with the card and manually adjust the exposure according to the built-in exposure meter, the scale of which is shown (in M mode) in the viewfinder or on the display. Remove the grey reflector card from the composition and you are ready to shoot. Given the still life described, this is product photography, we have the camera on a tripod and there is no problem inserting or removing the card, feel free to repeat it every time the scene changes.
To maintain control of your aperture, shutter speed, and ISO, you must shoot in manual mode, however this technique allows you to get a near perfect exposure.
How do professionals use a gray card with film?
They have external exposure meters that are able to measure the incident light. Unlike the built-in exposure meters of cameras, which always measure reflected light. You can tell by the fact that when we photographers measure correct exposure, we point the camera at our subject. A camera assistant on a film, on the other hand, walks into the scene with a meter and measures the incident light, for example, on the face of the main character in the shot. So he points the exposure meter in exactly the opposite direction to the photographer.
In a professional digital photography studio, a so-called flash meter used to be used in the same way. You held it close to the model’s body and fired off studio flashes. Exposure values, aperture and exposure time for the sensitivity of the film being used were read off and the action was on. There was no preview (except perhaps a Polaroid) and the results were only seen after the films were developed.
How to use Grey card for white balance
The procedure is essentially the same as for exposure metering. The gray card is placed in the scene and the White Balance is set manually. Each manufacturer has its own procedure as to the order in which the buttons are pressed or activated in the menu. That’s no problem though, you learn your procedure and then it’s always the same.
By providing a “reference point”, an 18-gray card enables photographers to adjust their exposure and white balance settings consistently. The “reference point” is what the camera uses to determine what white balance and/or color profile it should use for a particular illuminant (light source). In other words, if the light coming from your subject is mostly blue, the camera will “compensate” by using a yellowish white balance and a reddish color profile. This will result in an image with the correct skin tone but which will appear a little bluish due to the presence of the blue-dominant light source.
The idea is to cover the entire area of the frame with a 18%grey card, and run a process in the camera that will measure and store the light color on the calibrated area. And then the camera uses that value for each subsequent shot until you remeasure/save the values, or until you change the gray balance (WB) to one of the preset modes (e.g. daylight, incandescent, flash, overcast, shade, etc.) or to auto (AWB). In the professional and film industry, special instruments are again used to measure the colour (more precisely, the chromaticity temperature) of the incident light, called colorimeters.
Grey card vs white card
It is also common to hear people say white card instead of gray card, but both words mean the same thing. The color balance card, color calibration card, digital grey card and color correction card are all just different names for the same device.
What to do if I don’t have a grey card?
If I don’t have an 18 grey card, a sheet of white paper, yes, ordinary, office A4, will help. I use it as successfully as a grey card for white color balance. I manually measure the white balance (WB) on it and save the value. For exposure, of course, it won’t fit, so I’ll measure approximately and correct the resulting value using exposure correction to the plus side. This is because pure white paper confuses the camera’s light meter system.
In fact, there is less reflected light than the measurement evaluated. When it comes to portrait photography, I always check especially skin tones, which are crucial to the result. If I’m shooting a wedding reportage, I may use the bride’s white dress to set custom white balance, and for exposure I will again go by the skin tone.
Let’s be precise in the field
Often at various workshops and photo shoots I come across the opinion that “it” is fine and that “it” will be adjusted afterwards. This is quite possible, but imagine a chef who would not pay enough attention to the seasoning of a dish because there is salt, pepper, vinegar, ketchup, etc. on the table. Personally, I would rather choose another restaurant next time.
Let’s use our cameras to the maximum
Let’s behave differently, let’s work like a Michelin chef. Let’s be professional, let’s use the technical possibilities of the cameras to the maximum and let’s work with real precision. The better job we do in the field, the less time we will need for corrections, adjustments and rescuing our photos in the computer post-processing.